August 30, 2012

More Creativity From Papa

I Was Able To Get My Hands On More Pictures Of Papa Craftsmanship...Enjoy...


Such A Wonderfully Crafted Bench!


Look At All Of That Solid Wood!


Another View


Papa Enjoying His Own Handy Work. He Made A Handful of These Rocking Chairs!


This Wagon Is So Adorable! Imagine The Detail In The Wheels!


He Also Made A Handful of These Smaller Rocking Chairs


Proof He Made The Windmill!  He Sure Is Proud Of It!
 
 
What An Amazing Talent That Has Been & Will Continue to Be Shared For Many Years!

August 27, 2012

Papa's Creativity

In This Post, I Would Like To Introduce You To A Wonderful & Creative Man Named Marvin 'Buck' Adams.  This Man Happens to Be My Aunt's Daddy, And Sadly, He Passed Away Last Week (which was preceded a few weeks prior by the death of her Mama). Since This Blog Is About Creativity, I Wanted To Share With You Papa's Creativity In His Honor.
 
Papa Was A Very Friendly Man! He Would Share The Best Stories, Which Were Hilarious Because Most Of Them Were About His Wife!  He Loved His Wife, His Children, His Grandchildren, & Most Importantly, He Loved The Lord.
 
But Aside From His Character, Papa Was Creative With Wood.  Between Me, My Mom, Sister, Aunt & Cousin, We Have A Lot Of Things Papa Has Crafted Over The Years.
 
He Mainly Crafted Things Out Of Wood.  He Would Gather The Scraps From Lumber Yards That Were Saved Just For Him By The Owners.  Although, Some Of The Items He Made Were Out of The Wood In Pallets & It Just So Happens, That is the Trend Now....Needless To Say, Papa Was Ahead of His Time!
 
He Truly Had a Talent.  Not Only Were The Items He Made Useful To All Of Us, They Were Also Wonderful For Decorating.  Everything Was Made So Well Too...You Would Have To Work At Breaking Any Of Them!!

 
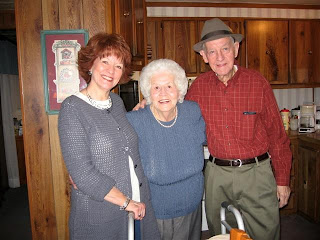
Here is My Aunt Jennifer and Her Mama Ernestine Adams (Granny to me) & Her Daddy Marvin 'Buck' Adams (Papa to me)


He Made This Windmill, Which My Mom Painted & Uses As Decor In Her Garden.


Here is The Rocking Bench He Made Out of a Pallet! Here Is My Daughter Enjoying Her Snacks In The Sun....What A Life!


This Cute Little Bench Has Been Used To Hold Stuffed Animals, Books, You Name It, But Now It Is A Perfect Decor Piece in My Mother's House


Papa Made My Cousin, Sister & Me Each A Table & Chairs For When We Had Kids. My Mom Has Been Hanging Onto Mine Until I Recently Redecorated My Daughter's Room.  She Loves It!


He Also Made This Rocking Horse, Which At The Time This Picture Was Taken, It Was A Little Big For My Daughter, but It Is The Perfect Size For Her Now!
 
 
There Are Many More Things That He Made Out Of Wood, Such A Rocking Chair (Big & Small) & A Toy Rocking Horse, But These Are The Only Ones I Have Pictures Of. 
 
Again, Papa Was Very Creative & Very Talented!
 
He Will Be Missed...

August 14, 2012

Car Seat Canopy Tutorial ~ FREE!!!

A While Back, I Saw A Car Seat Canopy on My Friend's Daughter's Car Seat & She Told Me That Someone Had Made It For Her.  So, My First Thought Was, "I Can Make Those Too"!!! It Just So Happened That I Had Planned a Trip Up To Hobby Lobby (the closest one to me is 45 minutes away!!!), So I Figured I Could Pick Out The Material While I Was There Since They Have the Most Adorable Patterns! I Went A Little Nuts & Bought Enough Material to Make 10 Canopy's! Now That I'm Blogging I Had to Purchase More Material so I Can Post on My Blog a Step-by-Step Tutorial on How To Make One Yourself!

Now, These Tutorials are All Over the Internet & There Are so Many Versions (some I would like to try at some point), But Mine is the Simple Car Seat Canopy....


Items You Will Need:

1. 1 1/2 Yards of Two Different Materials (pre washed & ironed)
2. Thread
3. Sew On Velcro (not shown)
4. Buttons


The Process:


Lay Both Pieces Out Flat, Right Sides Together
Measure From One Sided Salvaged Edge 41" & Mark All The Way Across
Cut Off Piece Using Your Mat & Rotary Cutter (if you have them)
Save That Strip for The Straps!!!


Square Up Your Material By Cutting Off One of The Other Edges. This Allows You To Have A Straight Edge To Measure From For The Next Step


Now That 3 Edges of Your Material Are Straight, Measure 31" From One Side To The Other Starting From The Edge You Just Trimmed Up

*** Basically You Want Your Material To Be 41" x 35" ***


Now Grab Something Round (a plate is a great choice) & Round All 4 Corners


Pin All The Way Around Your Material
Be Sure To Leave An Opening (a trick I learned is to use 2 red pins to mark your opening!!!)


Sew a 1/2" Seam All The Way Around
(don't forget to backstitch where you start & stop)


Cut Out Notches on All 4 Corners. This Makes The Corners Smoother When You Turn The Fabric Right Side Out


Now For Your Straps ~ Same Idea ~ Lay Your Fabric Flat With Right Sides Together & Cut Two 5" x 9" Pieces (you'll see why so much, later)


Pin & Sew a 1/2" Seam, But DON'T FORGET To Leave An Opening!!!
(sorry this picture is turned sideways. I need a better photo program on my computer!)


Turn Both Your Canopy & Straps Right Side Out & Iron Flat


Now Sew Your Top Stich. Sew a 1/4" Seam All The Way Around. Be Sure To Close Up The Openings On Both the Canopy & Straps With Your Top Stich!


Next You Sew The Velcro To Your Straps.
(not sure what happened to that picture, but it's pretty basic and you can see some of it below)


Placing The Straps In The Right Spot Can Be Tricky, But This Is The Best Place I Found...
The Center of Your Straps Should Measure 15" Down From The Top Of The Canopy 

Then, They Should Be 6" Apart From One Another. You Will Want to Find The Center of The Canopy's Width & Measure Out 3" For Each Strap.
In My Case, The Canopy's Width Was 34", So The Center Was 17", So I Place The Straps At The 14" & 20" Mark.


Pin The Straps In Place & Make Your Mark For Where You Will Sew Them Onto The Canopy. I Used My Ruler Because I like The Width, But You Can Use Whatever Width You Like.


Now Sew Along The Marks You Just Made, Starting & Stopping At The Seams On The Sides


Now It's Time To Sew On Your Buttons. I Hand Sew Them On, But If Your Machine Can Do It & That's Easier For You, Then By All Means...Go For It!


Tah-Dah!!!  You're Done!
Pretty Simple, Right?!


Here Are A Few Others I Did Before. I Didn't Do The Rounded Edges On These, But I Prefer The Way It Looks, So I Am Doing That From Now On.


August 6, 2012

My Daughter's New Room

It's Finally Finished!!!! I Can't Believe It! I Tell Ya, It Was A Lot Of Hard Work For Both Me and My Husband, But It Turned Out Wonderful!

We Created Two Separate Area's For Our Daughter - Her Kitchen & Her Reading Nook.

Let's Start With The Kitchen...


This is What The Kitchen Looked Like Before. My Mom Had Saved It From When My Sister & I Were Kids, Which I Am Thankful For Because I Get To Use It For My Daughter....Thanks Mom!


This Is The Kitchen. I Saw This Color When I Was Researching Ideas For This Kitchen & I Liked The Retro Green.
The Red Just Came To Me After & I'm Happy With The Way It Turned Out!


Here Is My Husband Hanging the Bead Board.
He Has a Little Inspector Making Sure He Is Doing It Correctly!


This is What It Looked Like When It Was All Painted, but Still Needed A Lot Of Personal Touch. The Sink Was Missing When I Received It From My Parents, So I Searched Everywhere For One & The One We Ended Up Using Wasn't Wide Enough, So My Handy Husband Added The Strip Of Wood!
He Also Replaced The Handles On The Stove & Refrigerator With Ones I Found at IKEA.


I Found This Shelf Liner At Target & It Matched Perfectly!


 These Two Pictures Are In Fact Different! Can You Figure Out How?....
The Blue & Red 'Basket's' I Found At Target Too & They Were The Perfect Colors & Size To Hold the Pots/Pans, Dishware & Food!


I Found These Red Pots & Pans By Melissa & Doug Online. I Had Already Purchased The Silver Metal Pots & Pans From IKEA (Along With Red Measuring Cups & A Spatula), But When I Saw These, I Knew I Had To Get Them. Who Knows, My Daughter May Be Cooking For A Ton Of People Someday!?

The Burners Where Part An Idea I Saw Online & Part My Idea. When You Google Play Kitchens, So Many Ideas Come Up & One In Particular Had Made The Burners Out of Wall Protectors (The Kind That Prevent a Door Going Through A Wall). I Bought Mine At Lowe's, But They Have Them At Home Depot Too. I Used Acrylic Paint To Cover Them. The Pegs I Bought Also At Lowe's. I Had Originally Used Round Ones, But It Didn't Turn Out Looking As Nice As the Square Ones. I Used Rust-Oleum 'Hammered' Spray Paint (see below) To Cover Them.


The Stove Knobs Was An Idea I Saw Online Too. Someone Had Gone Into An Appliance Repair Shop & Asked If They Had Any Spare Knobs & She Was Handed A Box Full.
I Wasn't As Lucky, Because I Had To Pay For Mine, But What's $7?!
I Found These Basic Replacement Knobs At Coast Appliance Parts, Co. 
I Love That They Have "Hi" & "Off" On Them! Almost Like It's The Real Thing!


I Bought These Porcelain "Hot" & "Cold" Knobs on eBay. Some Of the Ideas I Saw Online People Had Used A Whole Kitchen Replacement Kit, But Since I Had A Lot Of The Parts & Just Wanted To Upgrade Them For A Better Look, I Bought Parts Individually.


Here Is A Picture Of The Whole Sink Area. The Water Spout Used to Be Red, But Thanks to Rust-Oleum, It Looks Real!!! 


And For The Sink...As I Mentioned Above, I Had a Heck of A Time Trying To Find The Perfect Sized Replacement. I Tried Round Metal Mixing Bowls, Metal Serving Trays, Metal Loaf Pans...But Nothing Fit. So, I Decided To Dig For What I Had In My Kitchen & I Came Across This Silicone Loaf Pan Someone Had Bought For My Husband & Me For Our Wedding (7 yrs Ago). Whomever That Was, Thank You! I Made a Bunch Of Banana Bread With It Over The Years & Now My Daughter Gets To Use It, So What A Perfect Gift! I Spray Painted It With The Rust-Oleum 'Hammered' Spray Paint & It Looked Like Real Metal (not silicone)! I Bought The Spray Paint At Home Depot. I Don't Believe Lowe's Carries the Rust-Oleum Brand. One of My Favorite Buys!


For The Words On The Wall, I Used My Cricut. The Cartridges Were On Sale At JoAnn's Fabric, So I Bought A Few. This Font Is From Type Candy Font.


The Idea To Put These Pictures of My Daughter Up Came From My Sister-In-Law. She Said, "Babies Like Looking At Themselves," Which Is True, Plus, It Added Dimension To The Wall. I Found The Idea On Pinterest & It Lead Me to This Blog. Most Crafty People Have Mod Podge & Card Stock, Which Is About All You Need.  The Ribbon Is From Michael's, Which I Find Usually Has A Better Selection Than JoAnn's. 


  This Is The 'Dining' Area. The Table & Chairs Came From My Pap-Pah Who Had Made A Set For Me, My Sister & My Cousin Years Ago. They Are Solid Wood & The Perfect Size For My Daughter. The Table Cloth Came From My Husband's Grandmother Who Collected Linens. The Window Came From My Friends. They Replaced All The Windows In Their Home & Had Been Hanging Onto These Old Ones, So I Snatched One Up! The Branch Is From The Tree In My Front Yard & The Owl & Bird I Made From My Cricut Using the Straight From The Nest Cartridge.

The Valance Was So Easy. I Found A Tutorial On This Blog. It Didn't Take Much Time At All. It's The Same Tutorial I Used For The Valance Over The Kitchen
As Well As For The 'Reading Nook' (see below). Remember With Valances, Double Your Width So That It Gathers...Thanks Mom!


And For The Accessories....


The Ketchup/Mustard/Salt/Pepper Combo Was The Highlight Find! I, Like The Kitchen Sink, Looked Everywhere For A Retro Ketchup/Mustard Bottle Like These & I Wasn't Having Much Luck. I Went To Bed, Bath & Beyond (BBB) & Didn't See Them (although I found some other items I needed). So, When I Was About To Walk Away From The Register, Mind You Disappointed That BBB Didn't Have What I Was Looking For, I Asked The Woman Checking Me Out...Long Story & 30 Minutes Later...They Brought Me This Combo! Best Part, It Was Only $4.99!!! On Sale!! The Salt/Pepper Shaker Didn't Have Anything On Them, So I Used My Cricut To Put the 'P' & 'S' On Them. I Love That They Are Plastic...Child Proof!


I Found The Broom & Dust Pan At Tuesday Morning (You Never Know What You'll Find In There!) I Also Found The Red & White Towels Below There.

The Bird Hooks Came From The Target $1 Bins. They Were Black, So I spray Painted Them White To Match The Rest Of The Decor.


The Chalkboard On The Fridge Was My Idea. I Had Originally Wanted To Paint It With Magnetic Paint & Use Some Sure Magnets I Found At Michael's, But the Paint Didn't Work. The Magnets Didn't Stick, So I Went With The Chalk. We Used The Bead Board & Bead Board Frame, Painted It & Rubbed Some Chalk On It.
When My Daughter Gets Older, She Will Have Fun Making Her Own Grocery List!


 The Reading Nook ~  

I Wanted To Create A Space For My Daughter To Explore Her Books (since she can't read yet) & I Found The Idea Of Transforming the Closet Into A Reading Nook Online. Perfect Hide-Away!


I Knew We Had To Take The Closet Door Off The Hinges The Moment My Daughter Shut Herself In Her Closet, So I Made a Valance For Privacy (and Decor) Using The Valance Tutorial Mentioned Above. The Curtain Rod I Found At Anna's Linens.


I Painted Her Closet Blue, Then Added The Stripes. I Kind Of Stole The Idea From My Friends, The Ahlbergs! Thanks Guys! I Found The Pink Owl Chair Over A Year Ago At The Home Goods In The Bay Area & Since My Daughter's Room Was Owl Themed, I Had To Get It.
The Rocking Chair Was Mine When I Was A Kid.


My Sister-In-Law Found This Idea To Use Crates As Bookshelves On This Blog. I Didn't Find The Exact Crates From Michael's That the Blogger Found, But I Did Find These There. I Only Had To Paint Them White & Hang Them. No Cutting Necessary!


As I Mentioned, This Project Was A Lot Of Work, But So Worth It! My Daughter Is Only 21 Months Old & She Doesn't Quite Have The Concept Of The Kitchen Down Yet, Nor Does She Read Yet, But Someday She Will, Which Is Why It's Worth...She Won't Out-Grow It For A Few More Years!